Improving Swift Unit Tests with Objective-C

Did you know that improving Swift unit tests with Objective-C is something that is actually possible? Yes, it is, specifically when writing unit tests for legacy Objective-C code. One common definition of legacy code is “code without tests..”

A different definition of “legacy code” that might resonate with iOS app engineers is any code written in Objective-C. Swift is nearing its third anniversary of being announced to the world. It’s no longer the immature adolescent that can be passed by for the old reliable language, Objective-C. Instead, it’s now something that you can’t ignore as an iOS engineer. It’s the future direction of our platform. If you’re still writing Objective-C code, you should have a darn good reason as to why. Now that’s not to say you should never expect to work with Objective-C at the moment. In fact, working with Objective-C is a very real thing for most of us. Most of us don’t have the luxury of working entirely with a shiny new Swift code base. Most of us have to support older apps that have a large amount of Objective-C code. And whether or not you want to consider that “legacy code,” the fact of the matter is that it’s there, and you have to deal with it.

An Unexpected Case for Swift

Whether you’re an advanced Swifter who’s soaked in each release since the first version, to someone just getting familiar with the language, writing unit tests with Swift is something that anyone can do. Obviously you can write unit tests for Swift code with Swift code, but did you know that you can write unit tests for Objective-C code with Swift? Yep, it’s possible, and I recommend it. It’s both a low risk way to practice your Swift coding skills, while also ensuring that you aren’t creating new Objective-C code that will just need to be migrated later. And even if you already have a unit test suite for a particular Objective-C class, you can still add a Swift XCTestCase subclass and add new unit tests for that same Objective-C class. In fact, I use this approach all the time. This works especially well when working with Objective-C code bases where you’re forced to write new Objective-C to expand the functionality of the app because you need to modify existing code. You can create a new Swift unit test for verifying the new functionality added in Objective-C.

If you are setting out to add Swift tests to a project that is entirely Objective-C based, there’s one little quirk with Xcode 8 to work around. You need at least one Swift file with a bridging header in your main target for Xcode to allow you to import that target into your Swift unit tests as a module. Otherwise you will get an error, “No such module” when attempting to run your Swift test.

A Problem You’ll Encounter

After writing Swift for a while, it’s easy to to forget that back in the Objective-C world, each class generally had two files, a header file (.h) and an implementation file (.m). Best practice suggested that unless something needed to be exposed to other classes, it should go within the .m file alone. This went for method definitions and property declarations. For example, consider this UIViewController:

#import "ViewController.h"

@interface ViewController ()

@property (strong, nonatomic) UILabel *nameLabel;
@property (strong, nonatomic) UILabel *emailLabel;

@end

@implementation ViewController

- (void)viewDidLoad {
  [super viewDidLoad];

  self.nameLabel = [[UILabel alloc] initWithFrame:CGRectMake(10, 30, 200, 20)];
  self.emailLabel = [[UILabel alloc] initWithFrame:CGRectMake(10, 50, 200, 20)];

  [self.view addSubview:self.nameLabel];
  [self.view addSubview:self.emailLabel];

  self.nameLabel.text = [[NSUserDefaults standardUserDefaults] stringForKey:@"name"];
  self.emailLabel.text = [[NSUserDefaults standardUserDefaults] stringForKey:@"email"];
}

@end

viewDidLoad() sets two labels based on some values stored in NSUserDefaults. Lack of dependency injection aside, coming up with an approach for writing a unit test for this method is fairly straightforward, and just as easy to implement that approach in Objective-C:

#import <XCTest/XCTest.h>
#import "ViewController.h"

// Private Category Trick to expose private properties for testing
@interface ViewController (Test)

@property (strong, nonatomic) UILabel *nameLabel;
@property (strong, nonatomic) UILabel *emailLabel;

@end

@interface ViewControllerTests : XCTestCase

@end

@implementation ViewControllerTests

- (void)testViewDidLoad_SetsLabels_Always {
  NSString *name = @"Andy";
  NSString *email = @"andyo@notanemail.com";
  [[NSUserDefaults standardUserDefaults] setObject:name forKey:@"name"];
  [[NSUserDefaults standardUserDefaults] setObject:email forKey:@"email"];

  ViewController *toTest = [[ViewController alloc] init];
  [toTest viewDidLoad];
  XCTAssertEqualObjects(name, toTest.nameLabel.text);
  XCTAssertEqualObjects(email, toTest.emailLabel.text);
}

@end

Objective-C makes it really easy to get access to the private properties for nameLabel and emailLabel, just use a private category defined within the sample .m file for the XCTestCase subclass.

Now, let’s say you’re taking my advice, and trying to write this unit test in Swift for the same Objective-C class. You’d probably start with something like this:

import XCTest
@testable import SwiftTestsForObjC

class ViewControllerTests: XCTestCase {

  func testViewDidLoad_SetsLabels_Always() {
    let name = "Andy"
    let email = "andy@notanemail.com"
    UserDefaults.standard.set(name, forKey: "name")
    UserDefaults.standard.set(email, forKey: "email")

    let toTest = ViewController()
    toTest.viewDidLoad()

    XCTAssertEqual(name, toTest.nameLabel.text)
    XCTAssertEqual(email, toTest.emailLabel.text)
  }
    
}

It’s a pretty straight forward translation from the Objective-C test. The only problem, there’s a compiler error:

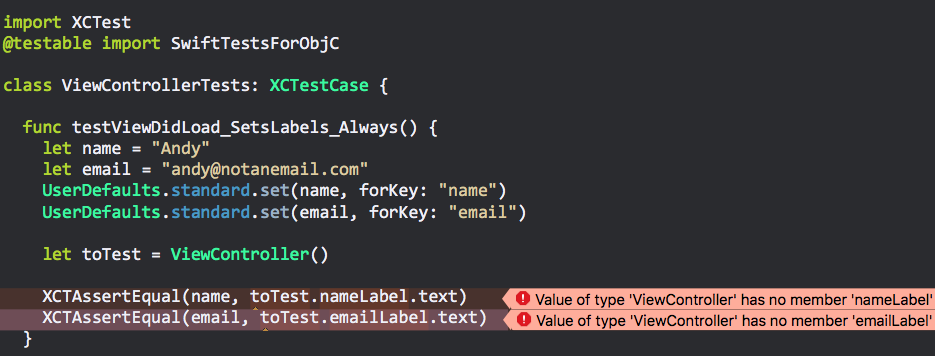
The compiler is telling you that it can’t find the method definitions for nameLabel or emailLabel on ViewController. It’s actually the same problem that you would have experienced in Objective-C had the trick of using a private category not been in place. Some testing enthusiasts advocate that all code be testable. You have to balance this with other design principles. For me, I’m not going to violate the protection of encapsulation by exposing those two UILabel properties through the header file – they don’t need to be there.

So how do you fix it?

Solving The Problem, with Objective-C

Objective-C to the rescue. You can solve this problem by using a similar trick to the one that we originally used to get the Objective-C version of this test to work: a category. This time though, it won’t be a private category, instead it will be a test-target scoped Objective-C category that exposes the private properties from ViewController.

Here’s how you do it:

Step 1: Create a new header file in the group for your unit tests and name it ViewController+Testing.h (the prefix should match the class under test, and a suffix of +Testing isn’t technically required, but helps provide a context to the purpose of the file):

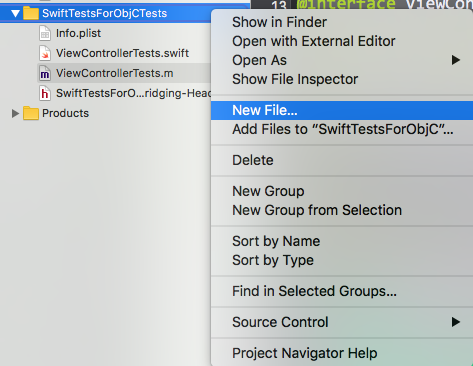
Step 2: Add a private category that exposes the private properties on the class you need to test:

@interface ViewController (Test)

@property (strong, nonatomic) UILabel *nameLabel;
@property (strong, nonatomic) UILabel *emailLabel;

@end

Step 3: Import the header file from the bridging header for the test target:

#import "ViewController+Testing.h"

And 💥, that’s it! Go back and attempt to compile your Swift test where you are accessing those properties, and you’ll it works!

Despite this simple example, this strategy can be used any place that you would like to write a Swift test and access private methods or properties on an Objective-C class.

I wired all this up together into a final project where you can see how it all works and try for yourself here.

How about you?

Have you dipped your toes into the international waters of crossing the borders between writing tests between Objective-C and Swift? What challenges have you encountered? How have you found it? Leave a comment and let me know!

Extract Class Refactoring in Swift

In “Refactoring, Improving the Design of Existing Code” by Martin Fowler, he presents the Extract Class refactoring.

Here’s a video walkthrough of the Extract Class refactoring in Swift and when you might want to use it:

Video Transcript

No video transcript this time. If you find a video transcript useful, please let me know in the comments.

How To Pick The Right Swift Open Source Component

With so many options available, it’s not easy figuring out how to pick the right Swift open source component. There are literally thousands, if not hundreds of thousands, of open source projects written in Swift on the web. You can find anything from simple UI widgets, to entire frameworks to support functional reactive programming. With all these choices, how do you pick the right Swift open source component to use in your project? Initially, you first have to find a component that actually meets your needs from a functionality standpoint. But after that, and arguably just as important, that open source code base must meet a minimum set of requirements to be considered for use in a production application. Here are the proposed minimum requirements to pick the right Swift open source component:

  1. Composition over inheritance
  2. Date of most recent commit
  3. History of past commits
  4. Popularity among the community
  5. Dependency manager support
  6. License
  7. Tests
  8. Proper versioning
  9. Maintenance ownership
  10. README

While most of this article’s proposed items apply to any open source project on the web, the specific examples cited in this article will be focused on performing the evaluation within the context of GitHub.

Composition Over Inheritance

You must have heard of “protocol oriented programming” by now. Have you heard what Crusty had to say? (Or if you want a quick read, here’s a good one.) When looking to pick a Swift open source component, it’s very important to look for one that prefers composition over inheritance. It should be in the forefront of your mind when looking to pick a Swift open source component. Think though how you would use the component? Look at the example usage. Does the component require you to subclass something in order to use it? Does the component require you to override base implementations of a super class in order to customize behavior? If so, steer clear. This is a sign of an inheritance-based customization model. Instead, look for projects that provide behavior customization through protocol conformance. Look for Swift open source projects that require you to compose the component as a variable rather than subclass something. These are signs that the project has already made an effort to code in the Swift way, rather than hang on to techniques of the past.

Date of Most Recent Commit

This is an easy one to measure. Simply look at the date of the most recent commit in the project. There’s no hard and fast rule that says the most recent commit should be within X number of days, but it shouldn’t be so old that the current version(s) of Swift or Xcode aren’t supported. Additionally the date of the most recent commit is also a good quick representation of how active the project is under development. If the most recent commit is months old, yet there have been many recent Issues opened with no response from the author, that’s not a good sign.

swift open source component

History of Past Commits

Aside from the date of the most recent commit, it’s also a good idea to peak at the history of past commits. While the most recent commit could be a couple days ago, that could be the first commit in an entire year. That’s not good. It’s good to look for a steady stream of commits. A large number of commits can be a double edged sword as well. If you observe a large frequency of commits, that can also mean that the project has not matured to a stable state yet. And additionally, if not paired with a solid release versioning strategy where designated “releases” are indicated as such, a high frequency of commits can indicate instability of the current code base without a clear designation of when the last “stable” commit was.

Popularity Among The Community

A popular project is a sign of a healthy project. The more people using a project, the more likely it will be that the project will be up to date to begin with, and also stay that way. Github makes this easy. Two things I look for to evaluate popularity are: number of Stars, and number of different committers. These aren’t steadfast measures though. Many popular projects only have a single committer. Just things to peak at. It’s unlikely that a project has widespread community support if there are a small number of Stars and a single committer.

swift open source component

Dependency Manager Support

There are three popular iOS dependency managers available today, and each has a different level of maturity: CocoaPods, Carthage, and Swift Package Manager. If you haven’t used any of these, or are unfamiliar with what a “dependency manager” is, you should absolutely stop right now and go try one out. They will change your life, especially if you routinely use third party code in your iOS applications. When evaluating a Swift open source component, it’s always a good idea to check whether the project has already provided support for at least one of the dependency managers. This is a good indication that the project is mature, and also has at least a minimal release versioning strategy. Those familiar with the tools above will know to look for a Podfile, a Cartfile or a Package.swift file. If the project doesn’t have this it’s not the end of the world, you can be the first to take action with the author to attempt to move the project in that direction. Use the author’s willingness or responsiveness as a followup indicator of whether you want to build close ties with the project.

License

If there was one personal choice amongst this whole list, this is it. Everyone needs to choose for themselves which open source license is appropriate. The only unacceptable red flag to steer away from in a Swift project on the web is to have NO license.

Tests

It wouldn’t be the Clean Swifter blog if there wasn’t a pitch for tests. Unfortunately, this is probably the least likely thing to find in open source projects. Don’t consider it a hard requirement, but consider it a HUGE bonus if the project has tests. It’s an even bigger bonus if the tests are connected to a public continuous integration build process (like Travis or BuddyBuild) with an indication of test results in the README.

Proper Versioning

This is another style of icing on the cake, and may have varied levels of important depending on the popularity and size of the project. Sometimes for smaller projects, the HEAD of the master branch can be consider the most recent “release.” That can get sticky though, because it may require you to manually keep track of which revision you are using in your project. It also leaves it open to interpretation the advertised stability of the current revision. A solid versioning strategy indicated by the Releases view in Github is a good indicator of a well maintained project.

Maintenance Ownership

Finally, the last thing to consider when getting in bed with a Swift open source project is how maintenance of the project is handled. How many different people have committed to the project? How many open Pull Requests are there for the project? Are the Pull Requests stale, or actively under collaboration? How many open Issues are there? Are they under active collaboration? Does the owner of the repository even allow others to collaborate? Your guaranteed to eventually find something you’d like to tweak when using a Swift open source component. Make sure that you have an idea from the start of how you would ultimately get that tweak in place when the time comes.

README

There’s something about well polished documentation that gives a shine of professionalism on Swift open source components. For GitHub projects, this is often in the form of the README. It’s front and center when looking at a project. If the README is thorough, up to date, typo-free, and well formatted, that goes a long way to indicate the quality of the underlying code. If the README is empty, wrong, or sparse, that’s a red flag. Also, look beyond the README into the other documentation. Take a peak a commit messages and documentation in the code itself. Is it well documented?

Wrap Up

Even with the most rigorous of evaluation of Swift open source components, you should make careful architectural decisions and design choices so that the coupling between your code and the third party code is loose and easy to be changed. This is a hard lesson to learn if you don’t do it. And don’t forget, the best thing about open source code is that you can see the actual source! Beyond anything else mentioned in this article, feel free to dive down into the source and make an evaluation of the code itself. After all, you can code too.

What’s missing from this article? Are there any other tricks that you use when picking a Swift open source component?

Happy cleaning.

PS – If you use CocoaPods, the team has done a lot to automate much of this list in the form of their Pod Quality Index. You can get a quick summary of the overall quality of any given CocoaPod. Here’s an example for Alamofire. Here’s the documentation on how it is calculated.

Move Field Refactoring in Swift

In “Refactoring, Improving the Design of Existing Code” by Martin Fowler, he presents the Move Method refactoring.

Here’s a video walkthrough of the Move Method refactoring in Swift and when you might want to use it:

Video Transcript:

Hey, what’s up everybody, it’s Andy the Clean Swifter and I’m back here to show you another refactoring from Martin Fowler’s book, “Refactoring, Improving the Design of Existing Code.” Each week we’re taking a look at a different refactoring from that book and how to implement it in Swift 3. This week we’re going to talk about the Move Field refactoring. Now the Move Field refactoring you’re going to see, and I bet you’re going to write it off as something so trivial that you’ll be wondering why I’m even making a video about it. Before you do that, I want you to realize that the essence of refactoring is identifying an inefficiency with regard to the structure of your code, and improving it. It’s the building blocks of being able to look for these, knowing what to do, and building up that body of experience about refactoring and being able to apply that in much larger puzzles after you’re put together these smaller pieces and fundamentals along the way. Move Field is just that. It’s a fundamental refactoring where you’re going to see that in one class, or struct, that one field exists and it might not be the best place for it. You’re going to take that field and find a better place for it, and you’re going to move it there. All references will then point to that new field in the new location. Remember, the point is you’re taking a field from an inappropriate place to a better place. You’re not always going to be able to identify that up front. Don’t try to over optimize your code, whether it’s from a performance standpoint, or a refactoring standpoint. Go with your first natural design, and then once you get there, reevaluate it, and look for that better place of what the code could be. In this case we’re going to look at it from the perspective of the Move Field refactoring.

Just this week I’m going back to revisit some code in an app I worked on over a year ago. We went to long extents to refactor a NSFetchedResultsController from a UIViewController from it’s tableView datasource and delegate. They are all separate classes in separate files in Objective-C. Going back to that code, it’s hard to digest and understand. At the time, we thought we were being so clever with this refactoring, and thought the code was going to be so flexible for further design. Little did we know, it would be the last update we’d make to that code for a year and a half. We’re actually going back to it now, and rather than being flexible for design, it’s kind of hard to improve. My moral here with these basic refactorings, remember, yes they are basic, but they’re the fundamental for doing something bigger, and being able to put the puzzle pieces together to ultimately improve your code. Let’s look at the Move Field refactoring.

We’re going to reuse the sample code that we used in our refactoring last week, Move Method, and continue with that. I’ve added a new method here, displayFirstName() that will help explain this example for Move Field. In general, there’s a struct that represents a person’s name. It has a first and last String. There’s a view controller with a label, a name, and nickname String. There’s a viewDidLoad() implementation, and another method to displayFirstName() and lower on is a separate class for NameLabel. For the Move Field refactoring, what we’re going to do is identify a field in a class and find a new place for that field that makes more sense. Let’s take a look at this view controller to identify that field that’s going to move. viewDidLoad() sets a name label based on the first name. There’s this other method which isn’t being called at the moment, which is displayFirstName(). displayFirstName() looks like it is doing something a little different than setNameLabel. displayFirstName() is actually going to use nickname, the String on this view controller, and then based on whether there is a nickname or not, format the string and set it on the label. The first thing that jumps out to me is that nickname is being used here as a variable separate from the Name object. That to me smells a little bit. I think the nickname would be more appropriate as an attribute on the Name struct. This is where we are going to start honing in on our Move Field refactoring. Move Field refactoring now that I’ve picked nickname as something that doesn’t make sense in this view controller, and would make better sense in the Name struct, I’m simply going to pull this out of the view controller, and insert it into the Name struct. And now that the nickname is there I’m going to get a compiler error here back in the view controller because nickname is no longer a property on the view controller, and instead it’s being provided by the Name. Then I can access it through name and if name has a nickname then set it to be this interesting label where it’s the firstName plus the nickname, or just set the label to be the first name. That’s it! That’s Move Field in a nutshell. Depending on which logic might be used for computing nickname on setting or getting, you may want to consider different types of encapsulation for the logic which might happen at that point. None of that is happening here. In essence, Move Field is removing a property from one class, and adding it to another, in this case a struct. In my opinion, this is a much cleaner implementation. nickname goes with a Name. It’s no longer a property hanging off the view controller. It’s well enapsulated within Name.

There you have it, it’s the Move Field refactoring from Martin Fowler’s book, “Refactoring, Improving the Design of Existing Code.” It is a very simple refactoring, and you saw a very simple implementation of it where you move one field from a class to another class, all in the sake of finding a better home for that field which can make more logical sense for your code, and support a better encapsulation of your code. I hope you enjoyed this video. You can buy Martin Fowler’s book. “Refactoring, Improving the Design of Existing Code” in the Amazon Affiliate link in the description for this video. I hope you tune in next week for another refactoring. In the meantime, happy cleaning.

Weekend Reading, September 9, 2016

Weekend Reading, September 9, 2016, click here

Happy Friday fellow Clean Swifters, I’d like to welcome a bunch of new readers who discovered cleanswifter.com from Dave Verwer’s iOS Dev Weekly. I’m heading down onto the Chesapeake Bay this weekend for some fishing and crabbing. It’s been a banner year for Blue Claw crabs. In the downtime, here’s what I’ll be reading to catch up from the week.

Also, I’m wondering: What do you to to improve your software development skills?

Get “Weekend Reading” delivered in your email, as well as every other cleanswifter.com post, and receive a free screencast on iOS automated testing by signing up here. “Weekend Reading” is created through AWeber’s app, Curate, which I helped create and is entirely written in Swift.

Happy cleaning

Dependency Injection with Storyboards

Dependency injection with storyboards is not always straightforward, yet there are a couple techniques that can help you achieve programming nirvana. Dependency injection is a great technique that can help enable more modular and easily testable code. Unfortunately, since Storyboards can often mask how things like transitioning from one view controller to another works under the covers, there aren’t always obvious hooks for implementing dependency injection with Storyboards. Don’t stray to the dark side, singletons are not the answer. There is a way to the light, and I’ll show you a couple techniques for using dependency injection with Storyboards.

What Dependency Injection Is

Have you heard colleagues or friends talk about “dependency injection” but you never really knew what it was? It’s a fancy term for a simple concept. James Shore sums it up really well:

Dependency injection means giving an object its instance variables. Really. That’s it.

Here’s an example view controller definition:

class FirstViewController: UIViewController {
  var persistenceStack: PersistenceStack?
}

FirstViewController defines an instance variable persistenceStack that is open to any other file in the same module. This means that any other class, struct, protocol, whatever, that has access to an instance of FirstViewController may provide it the persistenceStack. Voila, that’s dependency injection. It’s nothing more complicated like that. Said a different way, FirstViewController has a dependency on PersistenceStack and that dependency is provided, or injected, by something else.

Why Dependency Injection Is Important

Dependency injection is an important principle in clean software engineering. The most important reason that you should use dependency injection is that it detaches the implementation of behavior from the interface of behavior. Classes that are open to have their dependencies injected mean that they can be decoupled from the underlying implementation of those dependencies. It’s much easier to purely program to an interface or protocol if you don’t need to know anything about the underlying implementation of the dependency under use.

Imagine you are on a large development team working on a giant iOS application with hundreds of thousands of lines of code. You’re on the “Front-End” team where you focus on the development of the user interface. You spend most of your time in Interface Builder and view controllers. Elsewhere in the company, possibly in a different office, is the “Persistence-Tier” team. The Persistence-Tier team is responsible for writing the mission critical portion of the application that saves things to disk, and keeps those objects in synch with the server-side backend. The thing is, as smart as the Persistence-Tier is, they are constantly changing their mind about the underlying implementation for their piece of the application. Lucky for you, the team has agreed upon a protocol-based dependency injection implementation for access into the persistence layer. As a team member working on view controllers all day, dependency injection prevents you from needing to worry about things like:

  1. How to instantiate the persistence stack.
  2. Whether the persistence stack has been properly configured.
  3. What is the underlying implementation of the persistence stack (eg. CoreData, SQLite, Realm, etc.).
  4. How does using a persistence stack affect automated testing

Instead, you can trust that this dependency will be properly provided to your view controller from some other place, and all you have to do is use it. Remember, it’s just an instance variable that is populated by something else. Your view controller has one less responsibility, and thus is that much closer to achieving the Single Responsibility Principle.

Testability

If you’re reading this blog, you’re probably interested in automated testing. Dependency injection is probably the single easiest way to improve the testability of your iOS code, well any code really, but particularly your UIKit-ladden iOS code. Rather than be tied to the underlying implementation of dependencies, you can provide your own implementation from your test classes, just like you would between classes in the real application. You can now easily stub out things like that persistence layer.

Why Dependency Injection With Storyboards Is Hard

Break out of the role play and back to the real world where most apps are created by a few people on a small team, if not a single person. While the analogy of a giant organization no longer holds true, the need to be able to swap persistent store implementations is something frequently encountered. There’s always a hot new player in the game. Now that you’re bought-in to dependency injection, it’s time to consider how to use the in iOS applications. Storyboards were introduced in iOS 5. Storyboards provide a holistic Interface Builder oriented way to create the user interface for your application. Rather than creating one-off xibs per view controller that then require you the engineer to wire together, a Storyboard allows you to design all your view controllers in one place where you can view all of them at one time, and wire them together such that the relationships between the screens is easily comprehendible in a single glance.

One problem of Storyboards is that they obscure some underlying details of how view controllers actually connect together and communicate. Specifically, when working with a Storyboard-based application, you are rarely writing code in a view controller that manually creates another view controller and brings it onto the screen. Instead, you are relying on segues, and unless you go out of your way to write code to prepare for a segue to happen, or manually trigger a segue, it’s easy to think that the magic of the Storyboard does everything for you.

For example, here’s a Storyboard:

Dependency Injection with Storyboards

This Storyboard represents an application with a navigation controller stack where the root view controller has a button to push a deeper view controller onto the stack. All that behavior provided for free from the Storyboard. Now how in the world would you use dependency injection to provide a dependency to the view controllers in this application? Good question, there are a couple ways.

Dependency Injection with Storyboards

Here are several techniques for implementing dependency injection with Storyboards.

Passing a dependency to an initial view controller

A common pattern you’ll see in iOS applications that use dependency injection is that specific dependencies for the application are instantiated in the custom UIApplicationDelegate for the application. From there, they are then passed into the initial view controller for use throughout the application. Here’s how you can do that. Consider the following Storyboard:

Dependency Injection with Storyboards

A single view controller is designated the Initial View Controller for the application. That means, that view controller will be the first one shown when the application is launched. There’s little corresponding code in the app’s custom UIApplicationDelegate:

func application(_ application: UIApplication, didFinishLaunchingWithOptions launchOptions: [UIApplicationLaunchOptionsKey: Any]?) -> Bool {

  return true
}

The Storyboard does all the magic for ensuring that view controller is shown on launch. To inject a dependency into that view controller, you need to first create the dependency, and then set it on the view controller. You can use the window and its corresponding rootViewController to get that hook onto the Initial View Controller, like this (assuming a similar implementation of FirstViewController from earlier in this article):

func application(_ application: UIApplication, didFinishLaunchingWithOptions launchOptions: [UIApplicationLaunchOptionsKey: Any]?) -> Bool {

  let persistenceStack = PersistenceStack()

  if let firstViewController = window?.rootViewController as? FirstViewController {
    firstViewController.persistenceStack = persistenceStack
  }
  return true
}

Simply use access the rootViewController through the window and then combine that with an if let to downcast it to the specific implementation you need, FirstViewController. Then you have the hook you need and you can inject the dependency.

Passing a dependency to tab bar view controllers

Passing a dependency to view controllers that are part of a tab bar is a little more involved, and the technique is totally inspired from Greg Heo via his awesome two-part raywenderlich.com video tutorial series on Core Data. Storyboards simplify the creation of UITabBar based applications to the point where there is no code representing the creation of the tab bar or its controller. Of course, you can go above and beyond and add code to customize behavior, but you have to know where to do it. Here’s a technique to inject dependencies into view controllers of a tab bar. Imagine an app with this basic Storyboard:

Dependency Injection with Storyboards

It’s nearly the project template for a Tab Based Application. Two view controllers coming off of a UITabBarController. The UITabBarController is designated the Initial View Controller in the Storyboard. In the same project, the AppDelegate has very little code at launch:

func application(_ application: UIApplication, didFinishLaunchingWithOptions launchOptions: [UIApplicationLaunchOptionsKey: Any]?) -> Bool {
  return true
}

There’s literally nothing happening in that method, the Storyboard is doing everything. Well, lucky for you, application(_:didFinishLaunchingWithOptions:) does actually get called, so it’s the perfect spot to instantiate meaty dependencies and provide them to the initial set of view controllers for the application. But before you modify that code, there’s an important intermediate step to take to ensure everything will be glued together properly, create a protocol! Create a protocol that each view controller will implement that indicates it can have it’s persistence dependency injected. This way, you can write polymorphic in the app delegate to inject the dependency, without needing to know the type of each and every view controller in the tab bar. Create this protocol somewhere:

protocol PersistenceStackClient {
  func setStack(stack: PersistenceStack)
}

Anything conforming to this protocol indicates that it can have a PersistentStack set on it.

Next, update any and all view controllers in the tab bar with an extension that indicates protocol conformance:

extension FirstViewController: PersistenceStackClient {
  func set(stack: PersistenceStack) {
    self.persistenceStack = stack
  }
}

And rinse repeat for each view controller in the tab bar. There are ways to further abstract this so as not to repeat code, but the sample will be simple for now.

Now you can add the magic glue to the app delegate:

func application(_ application: UIApplication, didFinishLaunchingWithOptions launchOptions: [UIApplicationLaunchOptionsKey: Any]?) -> Bool {

  let persistenceStack = PersistenceStack()

  if let tab = window?.rootViewController as? UITabBarController {
    for child in tab.viewControllers ?? [] {
      if let top = child as? PersistenceStackClient {
        top.set(stack: persistenceStack)
      }
    }
  }
  return true
}

It’s not doing much, but it’s a clever technique. Here’s what’s happening step by step:

  1. Instantiate the dependency.
  2. Grab the rootViewController.
  3. Loop through the child view controllers in the tab bar, and for each that is a PersistentStackClient, set its persistenceStack.

Boom, that’s it, dependency injected into a tab bar controller! See how the protocol allows you to set the PersistentStack in a loop without needing to know the exact type of the view controller?

Passing a dependency from view controller to view controller

Passing a dependency from one view controller to another can be done using:

prepare(for segue: UIStoryboardSegue, sender: AnyObject?)

prepare(for:sender:) is a method defined in UIViewController that may be overridden in your implementations. It’s specifically called right before a segue off of that view controller happens. The provided UIStoryboardSegue has details about specifically which segue was triggered since there could be more than one segue off of a view controller. Included with these details is the destination view controller.

Continuing our earlier example, imagine you have:

class FirstViewController: UIViewController {
  var persistenceStack: PersistenceStack?
}

class SecondViewController: UIViewController {
  var persistenceStack: PersistenceStack?
}

Each view controller has a dependency that may be injected, persistenceStack. Here’s how you may inject persistenceStack from FirstViewController into SecondViewController assuming that they are wired together with a segue in the Storyboard:

class FirstViewController: UIViewController {
  var persistenceStack: PersistenceStack?

  override func prepare(for segue: UIStoryboardSegue, sender: Any?) {
    if let destination = segue.destination as? SecondViewController {
      destination.persistenceStack = persistenceStack
    }
  }

}

In this implementation of prepare(for:sender:), the destination is retrieved from the UIStoryboarSegue and if it is a SecondViewController then it’s persistenceStack is set, and thus the dependency is injected!

Wrap up

These couple techniques for using dependency injection with Storyboards will bring the cleanliness of your iOS code to the next level. Bart Jacobs’ has a great quote about dependency injection: “It felt as if I graduated as a programmer and no longer needed the singleton pattern to glue the pieces of a project together.” Here’s another good resource titled Nuts and Bolts of Dependency Injection in Swift that you will find helpful, and goes much more in detail on the basics of dependency injection in Swift, and why you should use it. Are you a dependency injection zealot yet? Are you already using dependency injection with Storyboards? How are you using it in your Swift iOS apps? Let everyone know in the comments!

Happy cleaning!

Move Method Refactoring in Swift

In “Refactoring, Improving the Design of Existing Code” by Martin Fowler, he presents the Move Method refactoring.

Here’s a video walkthrough of the Move Method refactoring in Swift and when you might want to use it:

Video Transcript:

Hey, what’s up everybody? It’s Andy from cleanswifter.com back to show you another refactoring from Martin Fowler’s book, “Refactoring, Improving the Design of Existing Code.” Each week I cover a different refactoring from his book showing you how to perform it in Swift 3. This week I’ll show you the refactoring called Move Method. Move Method is finally a refactoring that is the Mac Daddy of all refactorings. Move Method is very similar to ones we’ve seen before, like Extract Method. With Move Method, we’ll see how we can move code from one class to an entirely different class. When I think about refactoring, it’s not so much about changes within a single class. A lot of the refactorings we’ve looked at so far are like that- we’re massaging code within a single class. Right now, with Move Method, it might be the first time so far in this book where we’re going to see how you can take code from one class, and move it to another class all to improve the structure of your existing code. The reason behind Move Method is because one goal of software design is to keep coupling between “things” low. While you want to minimize coupling, you want to maximize cohesion. Cohesion represents how well defined a specific class’s purpose in life is. As soon as one class starts to do more than one thing, it is then not cohesive. For instance, you’ve heard of massive view controllers. Massive view controllers do not have high cohesion. And in fact, they are also probably very tightly coupled to other objects they interact with. Cohesion and coupling go hand in hand. Things that are tightly coupled to other objects often have very low cohesion. Where the opposite is also sometimes true as well. Things that are very cohesive, are also very loosely coupled to other objects. That’s the design you want to strive for, loose coupling and high cohesion. Move Method is a refactoring that is going to let you make changes to two different classes in order to achieve that design goal.

That’s the primary motivation behind Move Method. It’s when you’re going through some code and you see that the code you’re working with, and ultimately will be refactored, is interacting with another class on a detailed level. There might be several lines of code, all bundled together interacting with another class’s instance variables and methods. If you have a method on one class doing a lot of different things on another class, you want to consider moving that method to the other class. A common place I see this in my iOS code, particularly UI code, with UI widgets on screen and what I’m doing to them in view controllers. Let’s get more specific – UILabels. Often times in our code you’re going to come up with a UILabel which has one consistent style across your app. There might be a couple variations depending on where the label is appearing. Rather than repeating code to style your labels, what you can do, and what I’ll show you you can do, is create a subclass of that UILabel and move a method from a view controller that might be styling that label into the UILabel subclass. While I’ll show you this on UILabel, it can apply to a bunch of other UIKit classes like UITextView or UIButton. Anything that appears on screen with a style where you might be writing 5-20 lines of code that would normally be in view controllers – move that to a subclass of the element that you’re styling. Let’s take a look at how to do it in Swift 3.

In this code snippet, there are three different things we’re going to be working with: a struct which represents a name and has two strings for the first and last name. Next is a UIViewController subclass. The third thing is this empty UILabel subclass. To keep this example simple, I could have added some existing behavior into the label, or I could have omitted it and we could have created it during the refactoring. I didn’t do that, so right now it’s empty. Imagine either of those two scenarios, however you want. You’ll see how we’re going to use this with the refactoring. The interesting thing here in this refactoring is this setupNameLabel() method. This is where we are going to apply the Move Method refactoring. The Move Method refactoring at its highest level says we’re going to move this method to a new place. Obviously, the first place I would think to move this to is the NameLabel UILabel subclass. What we can do here is create the new method in the new/destination class, and then, copy and paste the code. This is one of the only times it’s okay to copy and paste code. We can leave the empty shell of the method here for now. We’ll go back and fix that. Now we need to go line by line in NameLabel and fix whatever syntax errors appear. The first one is indicating that firstNameLabel can’t be found. Since we’re now in the nameLabel subclass we don’t need to specify a label, since it is itself that should be modified. Since we’re in Swift, we don’t even need to specify self. The method will set four things: the text color, the alignment, the background color, and its text based on our style for the app. Down here is another interesting thing that we need to change. It’s actually setting the text of the label based on the first name in the Name struct. This is interesting. Unfortunately, NameLabel doesn’t actually know about Name yet. We have a couple options here. How can we get the first name into this method? The first option is actually pass in the Name itself, and this would compile. By doing this, we’re actually creating a coupling between NameLabel and Name – which may or may not be desirable. I’ll just point out another option where we can prevent that coupling is instead- send in the first name directly which we know to be a String. That’s another option. I personally like this option because it’s a little more explicit doesn’t create that coupling between Name and NameLabel. Some would argue that this second option exposes too many details about what NameLabel is actually doing because you need to know to pass the first name in as a String. Ultimately, these are two options you can think through for your specific use case.

Now we have the functionally equivalent setupNameLabel method in the NameLabel subclass. Now we need to go back to our ViewController and make a few changes. First, we’re going to delete the old setupNameLabel method. The compiler will now complain that the method no longer exists. Since we have the nameLabel as a property on the view controller, we can call setupNameLabel on that property. Since setupNameLabel now requires a first name, I will pass it in as a parameter. And there we go, our refactoring Move Method has been applied.

There you have it, that’s the Move Method refactoring. We applied it in a way that we cleaned up our view controller. Anytime you can do that, in my opinion, is a win. It’s so easy as someone new to developing iOS apps, all the way to even senior engineers, to work with code and create code that results with hundreds of lines long view controllers. There have been pattern after pattern created to try to avoid doing that. I think that knowing the basics about refactorings like Move Method help you understand some fundamental ways that you can think about tearing those things apart without needing to commit to a whole new framework or pattern, and instead just write cleaner code. That’s the move method refactoring. Again, the reasons you want to do this are create objects with low coupling and high cohesion. Ultimately you’ll also think about better names for methods and better places for those methods to exist.

I hope you liked this video from cleanswifter.com. This was the Move Method refactoring from Martin Fowler’s book, “Refactoring, Improving the Design of Existing Code.” You can buy the book in the Amazon Affiliate link in the description for this video. Come back next week and I’ll have a new refactoring available.

Thanks, and happy cleaning.

Post Weekend Reading for August 29, 2016

Post Weekend Reading for August 29, 2016, click here

Happy Monday fellow Clean Swifters.

First off, my apologies for not getting this weekend-reading published on Friday! I wouldn’t be human I couldn’t admit that the end of the summer is really busy, and while I wanted to get this out on Friday, life got in the way. That doesn’t mean the links stop coming though, or that you should skip sharpening that axe. I’ll just be setting aside a little more time this week to catch up. Here’s what caught my eye last week.

Get “Weekend Reading” delivered in your email, as well as every other cleanswifter.com post, and receive a free screencast on iOS automated testing by signing up here. “Weekend Reading” is created through AWeber’s app, Curate, which I helped create and is entirely written in Swift.

Happy cleaning

SFSpeechRecognizer Tips for iOS 10

Did you know that there’s a new iOS 10 API for transcribing audio in your iOS apps? I didn’t know that this was possible myself until I came across the Speech Framework introduced in iOS 10. In fact, I was actually watching one of Sam Davies’ screencasts on Ray Wenderlich’s new video site called Audio File Speech Transcription (both the screencast and the new videos site are fantastic by the way) where he covered how the API can be used to transcribe an audio file. The screencast itself is a fantastic short overview of how to use the framework to create an app that transcribes 90’s rap music files. I’m not going to try and recreate a tutorial on the basics of the API. Instead, when trying it out myself I discovered a couple nuances not mentioned in Sam’s screencast. Here’s a couple SFSpeechRecognizer tips.

Requires A Device

Use of SFSpeechRecognizer, the main class that makes speech transcription possible, will not actually transcribe anything unless you are running your app on a device (as of Xcode 8 beta 6). This was a surprise to me, especially considering that speech transcription of an audio file, rather than microphone input, has nothing to do with a physical device. I’m wondering if it has something to do with the underlying implementation of Siri and something that only exists on the actual device. Regardless, you are lucky enough to have access to a Bool on SFSpeechRecognizer called isAvailable. This Bool simply indicates whether speech recognition is available at the time of usage. I was actually banging my head trying to figure out how to get Sam’s sample project to actually work within the iOS Simulator. His screencast seemed to transcribe speech no problem in the app I was viewing on screen. Finally I looked closer and noticed that he was screensharing from an iOS device through Quicktime! Mystery solved! Either way, don’t make the same mistake as me and wonder why code like this didn’t work:

guard let recognizer = SFSpeechRecognizer() else {
  return
}

if !recognizer.isAvailable {
  print("Speech recognition not available")
  return
}

Timeouts

The other interesting discovery I made when playing around with SFSpeechRecognizer is that there is an undocumented limitation on how big of a file can be transcribed at once. I’m still playing around with the details as to where the limits are, but I have discovered, that longer running SFSpeechURLRecognitionRequest will timeout. I’m not even talking that long, like I had problems with a 5 minute video. For example, I tried transcribing my video Replace Temp With Query that is 4 minutes and 45 seconds long, and this was all the text that was returned before the timeout happens:

Hey what’s up everybody Danny from clean swiffer.com I’m here to show you another we factor in this week from our valors book we factoring in improving the design of existing time this week we’re gonna take a look at the re-factoring called replaced temp with Cory please temp with berries are factoring that’s a lot like expect nothing but there’s one difference it’s a little more specific with a place template query we’re going to specifically target temporary variables within our code and extract them into reusable piece of code so

Ya, not much (and not very accurate either). Either I should create a Radar for this, or Apple only intends for this API to be used for transcription of short audio clips. Time will tell.

Partial Transcription To The Rescue

Despite the undocumented timeout putting a crimp in my plans for using the Speech Framework in a couple longer running use cases, another Bool caught my eye: shouldReportPartialResults. It turns out my setting this flag to true, the Speech Framework will periodically provide transcribed results to you as they are discovered. Just set the value to true and you’ll see results continuously reported as they are determined:

let request = SFSpeechURLRecognitionRequest(url: url)
request.shouldReportPartialResults = true
recognizer.recognitionTask(with: request) {
  (result, error) in
  guard error == nil else { print("Error: \(error)"); return }
  guard let result = result else { print("No result!"); return }

  print(result.bestTranscription.formattedString)
}

Transcribing Realtime Playback

Despite these two shortcomings of short timeouts and requiring a device (which I hope Apple will fix at some point as the API matures), speech transcription is a really cool technology. Did you notice that voicemails in iOS 10 are automatically transcribed? It’s freakin awesome that you can glance at text for a voicemail rather than needing to listen?

Anyway another really cool real-world example of use of the Speech Framework is in the GitHub open source project Speech Recognition from zats. Apparently with some help from Apple, he came up with a way to transcribe a video on the fly. There’s some gnarly AVFoundation Objective-C code that made this possible. Be sure to take a look at his project and give it a go. And in fact, I’m wondering if I can use the techniques here to work around the timeout limitation I experienced with raw use of SFSpeechRecognizer. (Update: Turns out it did!)

Back Story

If you’ve read this far about SFSpeechRecognizer tips, I might as well bore you with some details on the back story as to why the SFSpeechRecognizer API caught my interest. With the videos I create for this site, it’s important to me to provide a transcription of the videos. I realize that watching a video isn’t always possible, so I like having a text alternative. It probably also helps with SEO as well. The thing is, transcribing the videos is a tedious process. For about a 5 minute video, it takes me about 30 minutes to transcribe it, and I type fast. Additionally, that’s only raw transcription. I’d like to do so much more. For example, I think the Realm videos are really well done. Specifically, two things I like are the links to jump to specific spots in the video from the transcription, and I also like the source code samples in the transcription. For me to do this it would take more time, so in attempt to look for a quick and easy fix to buy back some time, I figured I could use the new iOS 10 Speech Framework to code a speech transcription app to automatically transcribe my videos for me. I’m still working on it and definitely leveraging these SFSpeechRecognizer tips.

They say that necessity is the mother of all invention, right?

Wrap Up

How will you be putting these SFSpeechRecognizer tips to work? Have you had a chance to try out the new Speech Framework or any of the SFSpeechRecognizer APIs? Have you run into any other tricky spots or overcome any hurdles?

Happy cleaning.

Remove Assignment To Parameter in Swift

In “Refactoring, Improving the Design of Existing Code” by Martin Fowler, he presents the Remove Assignment To Parameter refactoring.

Here’s a video walkthrough of the Remove Assignment To Parameter refactoring in Swift and when you might want to use it:

Video Transcript:

Hey what’s up everybody, it’s Andy from cleanswifter.com and I’m here to show you another video in my series covering Martin Fowler’s book, “Refactoring, Improving the Design of Existing Code.” Each week I post a different video that shows you an example of the refactoring in Swift 3 and this week we’re going to look at a refactoring called “Remove Assignment to Parameter.” This is an interesting refactoring because technically the smell that this refactoring fixes isn’t even in Swift 3. I was debating on not even creating a video for the refactoring, but what’s interesting, is that the change from Swift 2 to Swift 3 is actually what prevents this smell from happening. Long story short, if you can continue writing your Swift 2 code, it is possible to run into the smell that this refactoring fixes. But in Swift 3, it’s actually preventable by the compiler. The other thing that I wanted to bring up is that because of the reason that Martin Fowler actually presents this refactoring. It’s primarily intended to resolve issues of clarity when looking at methods wondering whether parameters are being passed in by value or by reference. I’m going to clear that up for how Swift works and show you how the parameters are handled, and again it varies from Swift 2 to Swift 3.

The overview of this refactoring is essentially that if you have a method where you’re passing parameters to that method and you see code that then assigns new values to those parameters, that’s where you should introduce a temporary variable to use instead of assigning new values to the parameters. Essentially, parameters when passed to a method, should be treated like they are final. There shouldn’t ever be anything modifying the values of those parameters. You can of course call mutating behavior on the objects themselves, but don’t ever change the assignment of that object. That can be true for reference types or value types, and both have the same rules in Swift 3. Let’s take a look at this refactoring.

Here we have a class that is a name formatter. Right now all it has is a function that formats a name provided two strings representing the first and last name. You can see in the documentation that the method is intended to provide the format of “last name, first name”. Right off the bat, this is the smelly version of this code where lastName is passed in as a parameter and then immediately assigned to with a new value. Essentially, what this is doing is modifying the value of last name by appending a comma with a space and then returning that last name with first name appended. If you’re coming from Swift 2, you might have seen code that looks like this. This is telling the compiler that lastName can be changed- it’s not a constant in the scope of this method. Now you can see in Swift 3, which is running in this playground, that the compiler won’t even allow me to do this. For instance, if you end up Googling how to make a variable writable, you might see StackOverflow answers indicating to use the var modifier in the parameter definition. This works in Swift 2. It does not work in Swift 3. If you do put this back here, the compiler will actually tell you that parameters may not have the var specifier, and it even gives you a quick fix replacement in which a temporary variable for lastName is created and then used just as we had it in the prior implementation. That in fact is the refactoring, “Remove Assignment to Parameter.”

Now you might be telling yourself, “well Strings, they’re classes so they’re going to be reference types in Swift. What about value types?” Well let’s create a struct and see if the behavior is any different because normally I’d think, “Well I’m passing a value type in here, I have no guarantees that thing is going to be final.” I would suspect that it could be changed at any time. Instead, let’s create a struct representing a name. Name has a first name, and a last name. Let’s create a new version of this same formatter method fullName which takes a Name from our struct. Similarly it returns a String. To make the compiler happy at this point we’re going to return an empty String. The first thing we should try here is to assign a new value to the name parameter. We can’t as well because by default, whether it is a struct or a class, value type or reference type, method parameters in Swift 3 are final, and only final. That is a new Swift 3 feature. Similarly, the fix here would be to create a new temporary variable and then continue on using that temporary variable.

There you have it, that’s the “Remove Assignment to Parameter” refactoring in Swift 3. Now remember, technically in Swift 3 you’ll never find yourself in a spot where you have to actually perform that refactoring because the compiler won’t let you get there. Method parameters in Swift 3 are final by always and ever. This is unlike Swift 2 where you can use the var specifier to make the parameter mutable. Remember, if you’re Googling and find a StackOverflow answer or other old dated material that tells you to use a var specifier in order to add mutability to parameters, don’t believe it and realize that is a Swift 2 convention that is no longer possible in Swift 3. Feel good that if you’re writing Swift 3 and beyond, you won’t ever run into this. And if you do run into it, remember why. It goes back to the clarify of local reasoning. You won’t ever need to remember whether that parameter was passed by value or reference. Changing parameters passed by reference is really bad because you don’t know what all could be affected.

I hope you enjoyed this video from cleanswifter.com’s video series on refactoring covering Martin Fowler’s book, “Refactoring, Improving the Design of Existing Code.” You can buy that book in the description of this video using my Amazon Affiliate link. I’ll see you next week. Happy cleaning.